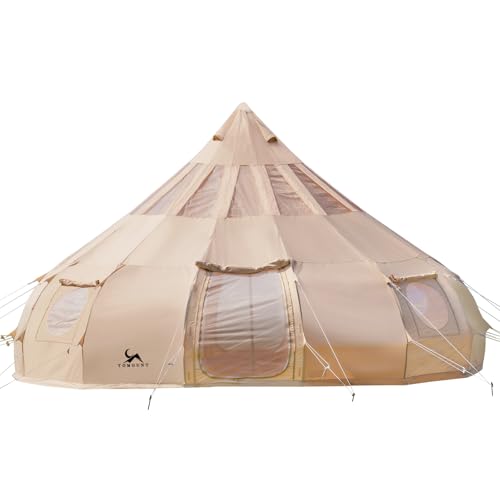
Yurt Kits: The Complete Guide to Portable, Durable & Versatile Shelter
Everything you need to know before buying a yurt kit. Learn about materials, sizes, setup, insulation, and how to choose the perfect yurt for camping, backyard living, or off-grid adventures.
START YOUR YURT JOURNEYWhy Yurt Kits? Yurts offer a unique blend of tradition and modern engineering. A quality yurt kit provides a sturdy, weather-resistant structure that can be assembled without specialized tools. Whether you need a permanent house yurt or a heated tent for winter, understanding the components is the first step to a smart purchase.
What Exactly Is a Yurt Kit?
A yurt kit is a complete package containing all the structural components needed to build a traditional circular dwelling. Unlike a standard pole tent, a yurt features a lattice wall (khana), a conical roof, a central compression ring (toono), and a tension band. Modern yurt kits often include pre-cut lumber, canvas or vinyl covers, insulation, and hardware. They are designed for easy assembly, often by two people in a single day.
Historically used by nomadic cultures in Central Asia, yurts have been adapted for contemporary uses ranging from cabin camping to glamping. The kit format removes the guesswork from sourcing materials. You receive precisely measured components, detailed instructions, and often, technical support. This makes yurt kits an attractive option for those who want a durable structure without hiring a construction crew.
Types of Yurt Kits: Which One Fits Your Needs?
Not all yurt kits are created equal. The right choice depends on your intended use, climate, and how long you plan to keep the structure standing. Below is a breakdown of the main categories.
1. Camping & Seasonal Yurt Kits
These are the lightest and most portable options. Often made from durable canvas or synthetic fabrics, they are designed for temporary use during spring, summer, and fall. If you are looking for a bell tent alternative that offers more headroom and a homier feel, a camping yurt kit is an excellent choice. They pack down into manageable bundles and can be set up on a camping canopy platform or directly on the ground with a proper floor.
For those who enjoy overland camping or river camping, a seasonal yurt provides a spacious shelter that resists wind better than many dome tents. However, they are not typically rated for heavy snow loads unless specifically reinforced. Always check the manufacturer’s snow load rating before using a seasonal yurt in winter conditions.
2. Four-Season & Winter Yurt Kits
If you plan to use your yurt year-round, you need a four-season kit. These feature heavier-duty fabrics, additional insulation, and a steeper roof pitch to shed snow. A heated tent or a yurt with a stove jack is essential for winter comfort. You can pair it with a portable wood stove to keep the interior warm even in freezing temperatures.
Winter yurt kits often include winter tent features such as reinforced snow flaps, extra tie-downs, and thermal liners. If you are planning a snow camping Alaska trip or a winter camping Yellowstone adventure, a four-season yurt is a reliable basecamp. Just ensure you follow winter camping safety protocols and have a winter emergency kit on hand.
3. Permanent & Residential Yurt Kits
These are built to last for years, often decades. They use thick canvas, high-grade vinyl, or even structural insulated panels (SIPs). A house yurt may include windows, doors, plumbing chases, and electrical wiring provisions. They are commonly used as guest houses, studios, or full-time residences in rural areas. If you are considering a permanent yurt, check local building codes and BLM camping rules if you are on public land.
Residential yurt kits are heavier and require a proper foundation, such as a wooden deck or concrete slab. They are not portable in the traditional sense. However, they offer an affordable alternative to traditional cabin camping structures and can be surprisingly energy-efficient when properly insulated.
Yurt Kit Comparison: Key Features at a Glance
Use this table to compare the three main types of yurt kits. Remember that quality tiers (entry-level, mid-range, premium) affect durability, weather resistance, and included accessories.
| Feature | Camping / Seasonal | Four-Season / Winter | Permanent / Residential |
|---|---|---|---|
| Primary Use | Summer camping, festivals, backyard retreats | Year-round camping, winter basecamps, hunting | Full-time living, guest houses, studios |
| Material Tier | Entry-level to mid-range canvas or synthetic | Mid-range to premium heavy canvas or vinyl | Premium canvas, vinyl, or SIP panels |
| Insulation | Minimal or none | Thermal liner or reflective insulation included | High R-value insulation, framed walls |
| Snow Load Rating | Low (not recommended for heavy snow) | High (engineered for snow shed) | Very high (building code compliant) |
| Setup Time | 1–3 hours (2 people) | 3–6 hours (2–3 people) | Days to weeks (professional installation recommended) |
| Portability | High (packs into bags) | Medium (bulky but transportable) | None (permanent structure) |
| Stove Jack | Optional | Standard or optional | Standard |
Pros and Cons of Choosing a Yurt Kit
✅ Advantages
- Rapid Assembly: Most kits can be assembled in hours, not days.
- Cost-Effective: Generally more affordable than traditional cabins or tent trailers.
- Weather Resistant: Circular shape sheds wind and snow efficiently.
- Versatile: Suitable for camping places, backyard tents, or permanent homes.
- Space Efficient: No corners means more usable floor area.
- Eco-Friendly: Many kits use sustainable materials and require less foundation work.
⚠️ Considerations
- Not Truly Portable: Except for small camping models, yurts are heavy.
- Foundation Required: You need a level deck or platform for permanent setups.
- Condensation: Without proper ventilation, moisture can build up inside.
- Permits: Check local national park rules and building codes.
- Insulation Challenges: Adding insulation after purchase can be difficult.
- Limited Privacy: Open floor plans are common; interior walls are not standard.
How to Choose the Right Yurt Kit
Selecting a yurt kit is a balance between intended use, climate, and budget tier. Here are the key factors to evaluate.
1. Determine Your Climate and Season of Use
If you only camp in mild summers, a seasonal yurt is sufficient. But if you plan to use it for winter camping, you need a four-season model with insulation and a stove jack. Consider the snow load in your region. A yurt with a shallow roof pitch may collapse under heavy snow, so opt for a steeper pitch and reinforced framing.
2. Choose the Right Size
Yurt kits come in diameters ranging from small (8–10 feet) for solo campers to large (30 feet) for family homes. A 12–16 foot yurt is ideal for a couple or small family. A 20–24 foot yurt can comfortably sleep 4–6 people with room for gear. For a permanent residence, 30 feet or more provides ample living space. If you are unsure, compare it to a tent vs hammock setup—yurts offer far more standing room and storage.
3. Evaluate Materials and Insulation
Entry-level yurts often use single-layer canvas or polyester. Mid-range models feature heavier canvas with a reflective liner. Premium yurts may use marine-grade vinyl or insulated panels. For cold weather, look for a yurt with a layering clothing system equivalent—i.e., a liner plus outer cover. Some kits include winter camping heaters compatibility, such as a stove jack.
4. Check the Frame and Hardware
The lattice wall (khana) should be made from flexible but strong wood, such as ash or oak. The roof rafters must be able to support snow and wind. Cheap kits may use thin poles that warp over time. Look for galvanized or stainless steel hardware to prevent rust. A quality kit will specify the wood species and treatment.
5. Consider Portability vs. Permanence
If you need to move your yurt between locations, choose a lightweight camping model. If it will stay in one place for years, invest in a permanent kit with a solid foundation. Some people start with a seasonal yurt and later upgrade to a cabin camping setup. Others use a yurt as a campground rental unit.
Setting Up Your Yurt Kit: What to Expect
Assembly difficulty varies by model. Most manufacturers provide a manual and sometimes video guides. Here is a general overview of the process.
- Site Preparation: Choose a level area. Clear rocks and debris. For permanent yurts, build a wooden deck or concrete pad. For camping yurts, a waterproof tarp or groundsheet works as a moisture barrier.
- Lay the Foundation Ring: Assemble the circular base ring or platform.
- Erect the Lattice Wall: Expand the khana and connect it to form a circle. Secure with the door frame.
- Install the Roof Ring: Lift the central compression ring (toono) and support it with temporary poles.
- Attach Rafters: Insert rafters from the wall top to the roof ring. This creates the conical roof structure.
- Add the Cover: Drape the outer canvas or vinyl over the frame. Secure with tension bands and ties.
- Install Insulation and Liner: If included, add the thermal liner and reflective layer.
- Finish with Doors and Windows: Attach the door, windows, and any stove jacks or vents.
For a visual guide on pitching similar structures, see our article on pitching tent techniques. While a yurt is different from a standard tent, the principles of tension and staking are similar. If you are setting up on a platform, read our tips on setting up a tent on a platform.
Maintaining Your Yurt Kit for Longevity
A yurt is an investment. With proper care, a quality kit can last a decade or more. Here are essential maintenance tips.
- Clean the Cover: Mild soap and water are usually sufficient. Avoid harsh chemicals that can damage canvas or vinyl.
- Re-waterproof: Canvas covers may need re-treatment every few years. Use a product recommended by the manufacturer.
- Check Hardware: Tighten bolts and replace rusted parts. Lubricate hinges and moving components.
- Ventilate: Prevent mold and condensation by opening windows and vents regularly. Use a dehumidifier in humid climates.
- Snow Removal: In winter, gently remove snow from the roof to prevent overload. Do not use metal shovels that can tear the fabric.
- Inspect for Pests: Rodents may chew through fabric. Keep the area around the yurt clean and store food properly.
If you are using your yurt in bear country, follow food storage rules to avoid attracting wildlife. Also, practice Leave No Trace principles to minimize your impact on the environment.
Frequently Asked Questions About Yurt Kits
How long does it take to assemble a yurt kit?
Most camping yurts can be assembled in 1–3 hours with two people. Larger four-season or permanent yurts may take 4–8 hours or more. Professional installation is recommended for residential models.
Can I use a yurt kit in winter?
Yes, but you need a four-season yurt with insulation and a stove jack. Pair it with a wood stove or a portable tent heater. Always follow winter camping safety guidelines.
Do I need a permit to put up a yurt?
It depends on your location. If you are on private property, check local building codes. On public land, you may need a special use permit. Review BLM camping rules and national park rules for details.
What is the difference between a yurt and a bell tent?
A bell tent is a single-pole canvas tent with a conical shape. A yurt has a lattice wall, a central roof ring, and multiple rafters. Yurts are generally more spacious and sturdier in high winds.
Can I move a yurt kit once it's assembled?
Small camping yurts can be disassembled and moved. Permanent yurts are not designed to be relocated frequently. If portability is a priority, consider a tent trailer or a mini camper instead.
Ready to Explore Yurt Kits?
Now that you understand the components, types, and maintenance of yurt kits, you are ready to make an informed decision. Browse our recommended products below to find the perfect yurt for your next adventure.
Further Reading & Related Guides
Expand your knowledge with these related articles from CampLifeEssentials: