Avalanche Safety: Essential Gear & Rescue Techniques
Master the fundamentals of avalanche awareness, choose the right safety equipment, and learn proven rescue protocols for backcountry winter adventures.
Shop Essential Gear →⚠️ CRITICAL WARNING: Avalanches are the leading cause of death in backcountry winter environments. According to the Colorado Avalanche Information Center (CAIC), 90% of avalanches are triggered by the victim or someone in their party. This guide provides life-saving knowledge—but formal training is irreplaceable. Always check local avalanche forecasts and never travel alone in avalanche terrain.
Every winter, thousands of backcountry enthusiasts venture into snow-covered mountains for skiing, snowboarding, snowmobiling, and winter camping. While these activities offer incredible experiences, they also expose participants to the hidden danger of avalanches. Understanding avalanche safety isn't optional—it's a fundamental responsibility for anyone traveling in mountainous terrain during winter months.
This comprehensive guide covers everything from the three essential pieces of rescue gear (beacon, probe, shovel) to advanced equipment like avalanche airbags and survival strategies. Whether you're a seasoned backcountry skier or planning your first winter camping gear expedition, these principles will help you make informed decisions that could save your life or the lives of your companions.
The Avalanche Triangle: Terrain, Weather, & Human Factors
Avalanches occur when three conditions align: steep slope angle (typically 30–45 degrees), unstable snowpack (weak layer beneath cohesive snow), and a triggering mechanism (often a person or snowmobile). Understanding these elements is the first step toward winter camping safety in avalanche-prone areas.
Terrain Recognition: Learn to identify avalanche paths—open slopes, gullies, and terrain traps like creek beds or cliff bands. Use topographic maps and slope angle tools (inclinometers) to assess risk before entering any backcountry zone. Even experienced winter travelers can misjudge slope angles; always verify with digital tools or paper maps.
Weather & Snowpack: Recent heavy snowfall, rapid temperature warming, wind-loading (where wind deposits snow on leeward slopes), and persistent weak layers (like depth hoar or surface hoar) dramatically increase avalanche danger. Check your local avalanche forecast center before every trip. Reliable sources include the weather apps for camping that integrate avalanche warnings and real-time snow data.
⚠️ High-Risk Indicators
- Recent avalanche activity: Seeing recent slides means conditions are unstable.
- Whumphing sounds or cracking snow: Indicates a collapsing weak layer.
- Heavy snowfall (>12 inches in 24 hours): Dramatically increases avalanche danger.
- Rapid warming or rain-on-snow: Destabilizes the snowpack quickly.
Essential Avalanche Rescue Gear: The Holy Trinity
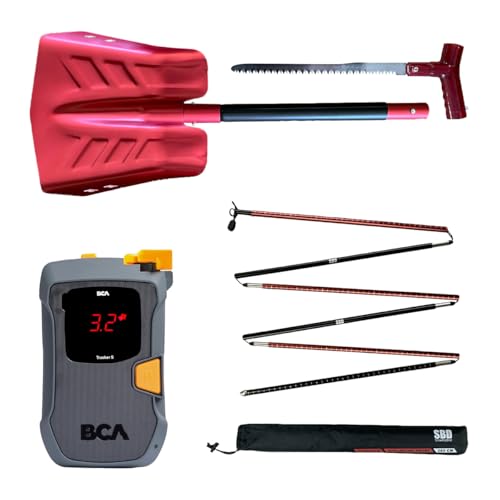
Every person traveling in avalanche terrain must carry three critical pieces of equipment: an avalanche transceiver (beacon), a collapsible probe, and a metal shovel. These items are non-negotiable. If you're assembling a winter emergency kit for backcountry use, prioritize these three tools above all else.
| Gear Type | Key Features | Price Range |
|---|---|---|
| Avalanche Beacon (Transceiver) | 3-antenna digital, marking function, 50m+ range, intuitive interface | $250–$550 |
| Avalanche Probe | 240-320cm length, quick-deploy, durable aluminum/carbon, diameter 10-12mm | $60–$120 |
| Avalanche Shovel | Metal blade (aluminum), extendable handle, saw/hoe feature, lightweight | $50–$150 |
| Avalanche Airbag Pack | Dual-chamber, removable airbag system, rechargeable cylinder, 150L+ deployment | $700–$1,500 |
How to Choose a Beacon: Modern 3-antenna digital beacons from brands like Mammut, Ortovox, BCA, and Pieps offer faster processing and multiple burial marking. Practice weekly—proficiency matters more than brand. Consider buying the same model as your regular partners for easier mutual assistance.
Probes & Shovels: Your probe must reach the maximum expected snow depth (240cm minimum). Shovels with metal blades dig through hard-packed avalanche debris; plastic blades will break. Look for ergonomic handles and a hoe position for efficient snow removal. Store your shovel and probe in your camping backpack's external pocket for immediate access.
Avalanche Airbags: How They Work & When to Use
Avalanche airbags reduce burial depth by increasing your volume, causing you to float toward the surface (inverse segregation). While not a guarantee of survival, studies show airbags reduce mortality by approximately 50% in fatal avalanches. The system consists of a backpack with deployable airbags (usually 150–170 liters) and a compressed air or battery-powered fan inflation system.
Key Considerations: Rechargeable cylinders (standard or supercapacitor) cost $30–50 per fill. Mechanical systems are not allowed on commercial flights. Always practice deployment before heading into the backcountry. Combine an airbag pack with beacon/probe/shovel—it's an addition, not a replacement. Modern airbag packs also feature dedicated camping cookware compartments and hydration ports for all-day backcountry tours.
Companion Rescue: The Golden 15 Minutes
After an avalanche burial, survival rates drop dramatically after 15 minutes. Most victims die from trauma or asphyxiation. A well-rehearsed companion rescue can mean the difference between life and death. Follow this sequence:
- Witness & Mark: Watch the victim's last seen point. Mark it with a ski pole or GPS waypoint. Turn off all electronics (they interfere with beacon search).
- Switch to Search Mode: All group members switch their beacons to search/receive mode. Spread out (20m spacing) and perform a coarse-to-fine search using signal strength indicators.
- Probe & Pinpoint: Once the beacon indicates a burial location (<1m separation), probe systematically in expanding circles to determine exact depth and position.
- Efficient Shoveling: Shovel aggressively from downhill side. If possible, dig a "V" shape trench above the victim to avoid re-burying them. One person digs while others probe and clear snow.
Every member of your party must practice this drill at least twice per season. Consider taking an AIARE (American Institute for Avalanche Research and Education) Level 1 course. Many online resources and best camping apps offer practice scenarios and digital beacon drills.
Avalanche Decision-Making: The A3 & Stop/Go Checklists
Even with perfect gear, poor decisions lead to accidents. Professional avalanche educators teach structured decision-making tools:
A3 Framework (Avalanche Awareness & Avoidance): Assess (current hazard rating, slope angle, recent weather), Analyze (snowpack test results, red flags like recent slides), and Act (travel plan, terrain selection, safe protocols). Always travel one at a time on suspect slopes and maintain visual contact.
Stop/Go Checklist: Before entering any slope >30 degrees, ask: Is the avalanche danger rated "Considerable" or higher? Are there recent avalanches? Is the slope convex or wind-loaded? If you answer YES to any, reconsider or choose a safer route. When in doubt, stay off the slope.
For those combining avalanche safety with other winter activities, understanding your camping styles and risk tolerance helps tailor decision-making. Solo travelers face elevated risk—always inform someone of your itinerary and carry a satellite communicator like a Garmin inReach.
Supplementary Winter Safety Equipment
While the holy trinity plus airbag forms your core rescue kit, additional gear improves survival odds:
- Rigid Avalanche Float/Spine Protector: Reduces trauma from debris impacts. Prices: $150–300.
- Emergency Bivy or camping blanket: Lightweight, reflective survival shelter for unexpected overnight stays.
- Two-Way Radio or Satellite Messenger: Crucial for calling for help when outside cell range. Two-way radios for camping allow group coordination.
- Extra Batteries & Power Bank: Cold drains battery life quickly. A camping power bank with 20,000mAh capacity can recharge beacons and phones multiple times.
- First Aid Kit (Trauma-Focused): Include tourniquet, chest seals, and splints. See our camping first aid kit guide for winter-specific additions.
🎓 OFFICIAL TRAINING RECOMMENDATION: Online guides are valuable, but they cannot replace hands-on instruction. Take an AIARE Level 1 course ($350–$550) or equivalent. These 2-3 day programs include field sessions, beacon drills, and real-world decision-making exercises. Your life is worth the investment.
Avalanche Forecasts & Trip Planning
Before every backcountry trip, consult your regional avalanche center. In the US, visit avalanche.org for a national map. Key data points include: danger rating (Low to Extreme), persistent weak layers, wind direction, and recent avalanche activity. Many camping navigation apps like Gaia GPS offer overlays for slope angle shading and avalanche paths.
Create a trip plan that includes: objective terrain, alternate low-risk routes, turnaround times, and emergency procedures. Share this plan with a non-traveling contact. If using a camping generator or other heavy equipment, store it securely—avalanches can carry heavy objects that cause trauma.
Pre-Departure Avalanche Safety Checklist
- ✅ Check avalanche forecast (24-hour and 48-hour outlook).
- ✅ Perform beacon check: all beacons on, transmitting, and in good battery condition (alkaline or lithium).
- ✅ Assemble probe and shovel: ensure mechanisms work smoothly.
- ✅ Review companion rescue steps with your group (verbal walkthrough).
- ✅ Pack extra layers, food, water, and camping meals for unexpected delays.
- ✅ Inform a responsible person of your route and expected return time.
- ✅ Charge all electronics (beacon, phone, GPS, satellite messenger). Carry backup batteries.
Remember: No backcountry objective is worth your life. Turn around if conditions feel wrong. The mountain will wait for another day. For more winter preparedness, explore our guides on hypothermia prevention, cold weather camping safety, and winter boots camping.
📋 Final Word
Avalanche safety is a continuous learning process. Read, practice, take courses, and travel with experienced partners. The gear recommendations and techniques described here are starting points—always follow official training and current best practices from organizations like the American Avalanche Association (AAA) and AIARE.