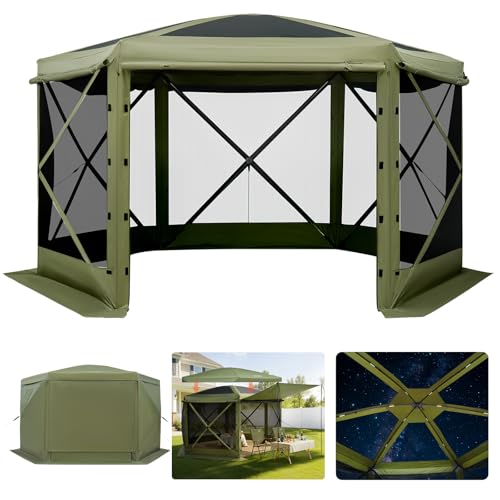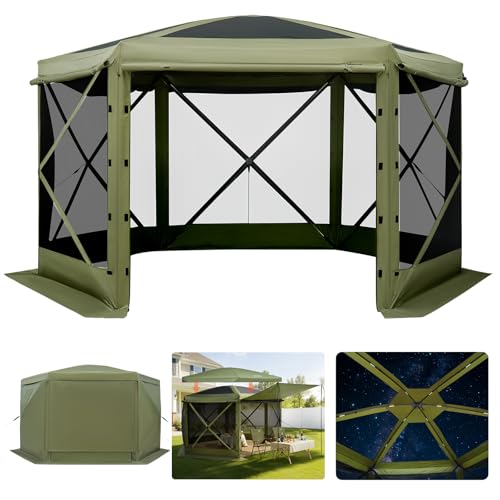
The Ultimate Guide to Pop Up Screen Tents with Rain Flaps
Enjoy the outdoors without the bugs or the downpour. A pop up screen tent with rain flaps is the perfect hub for camping, picnics, and tailgating.
VIEW RECOMMENDED GEARKey Takeaway: A high-quality pop up screen tent with rain flaps combines instant setup, panoramic views, and reliable weather protection. It transforms any campsite into a comfortable, bug-free living space.
Why Choose a Screen Tent with Rain Flaps?
For campers who want to maximize their time outdoors, a standard camping tent is just for sleeping. A pop up screen tent with rain flaps serves as a communal hub where you can cook, eat, and relax without being driven inside by mosquitoes or a sudden drizzle. These shelters are distinct from traditional camping gear because they prioritize ventilation and visibility. The rain flaps are a game-changer, allowing you to quickly seal the walls when the weather turns, providing a dry refuge without the hassle of taking down your entire setup. This makes them an indispensable part of any ultimate camping packing list, especially for car camping trips where space and comfort are top priorities.
The core advantage lies in their instant setup mechanism. Unlike a complex pole tent, a pop up shelter deploys in seconds, freeing up more time for camping meals or exploring nearby camping destinations. The screened walls offer an unobstructed view of your surroundings, making them perfect for scenic spots like lake camping or beach camping. When combined with comfortable camping chairs and a camping table, it becomes your outdoor living room.
Key Features to Look For
Instant Pop Up Design
The hallmark of these shelters is a pre-attached frame that folds and unfolds like an umbrella. Look for a durable steel or fiberglass frame. For more options on easy setup, explore our guide on the easiest tent to set up and take down.
Quality Rain Flaps & Seams
Rain flaps should be made of waterproof polyester or oxford fabric. The best models feature taped seams and a mesh screen that's fine enough to keep out no-see-ums. For extreme weather, always check our camping safety guide.
No-See-Um Mesh
A fine mesh is crucial. It blocks the smallest biting insects while still providing excellent airflow. This is especially critical if you’re camping with kids or in areas with heavy bug populations.
Size & Capacity
Models range from compact 6x6 foot designs for couples to 10x10 or 12x12 foot shelters that can host a group of 8–10 people. For family outings, consider the space needed for a family camping checklist.
Sizing and Practical Applications
Choosing the right footprint is essential. A 10' x 10' screen tent is the most versatile option, comfortably fitting a standard picnic table, four to six camping stools, and additional gear. This size is ideal for a family camping trip. If you need a dedicated space for cooking, a smaller 7' x 7' shelter can act as a screened-in camping kitchen, protecting your camping stove and cookware from wind and bugs.
For those who frequent organized campgrounds or enjoy glamping, a screen tent adds a layer of luxury. It provides a clean, defined space to store camping items like coolers, bags, and games, keeping them off the ground and protected. Many designs also come with optional awnings or can be paired with a separate camping tarp for extended shade.
How to Set Up Your Screen Tent in Under a Minute
- Unpack and Unfold Remove the tent from its carry bag. Hold the folded tent upright and gently pull the sides apart until it forms a rough square shape. Do not force it.
- Secure the Hub Pull up the center hub mechanism until it clicks into place. You'll hear a distinctive lock sound. This instantly erects the frame.
- Pop Out the Walls Push each side wall out from the inside until the frame locks. This creates the full structure. Now, stake down the four corners firmly into the ground.
- Deploy the Rain Flaps If rain is imminent, simply unroll the attached rain flaps from the top edge of each wall and secure them to the lower frame with the Velcro tabs or zippers. Ensure the flaps overlap for complete coverage.
For more complex setups on uneven terrain, check our tutorial on setting up a tent on a platform. To keep the interior comfortable at night, adding some camping lights or a camping lantern creates a magical ambiance.
Top Pick Comparison: Key Specs
| Model Type | Setup Time | Best For | Price Range |
|---|---|---|---|
| Standard 10'x10' Screen House | 45-60 Seconds | Family picnics & car camping | $800–$2,500 |
| Deluxe Hub-to-Hub Style | 60 Seconds | Windy conditions & extended stays | $2,500+ |
| Compact 2-Person Shelter | 30 Seconds | Beach days & solo trips | $800+ |
| Commercial Grade 12'x12' | 90 Seconds (2 people) | Group events & basecamps | $2,500+ |
Maintaining Your Screen Tent
Longevity is directly tied to care. Always allow the tent to dry completely before packing it away to prevent mildew, a common issue discussed in our guide on how long tents last. If the rain flaps get muddy, rinse them with a hose and a soft brush; avoid harsh detergents that can strip the waterproof coating. Store the tent in a cool, dry place. Following these simple camping essentials for maintenance will ensure your shelter lasts for many seasons, from spring camping to fall camping adventures.